Make bookmarking iPod files from audio CDs. All iTunes.Shareware to merge AAC files.
B. MarkAble, Highly recommended shareware with CD wizard $15 Markable and its CD Wizard takes over after you feed the CDs into your computer. Leave overnight to create bookmarking files in iTunes in either mp3 or full-function AAC format. Elegantly simple, no difficult file management, beginner friendly. [b]For step-by-step instructions with MarkAble screen shots and for a quick look at how very simple MarkAble is to use see MarkAble CD Wizard Tutorial .
C. For Mac:
Mac equivalent of MarkAble, Audiobook Builder
Install Bookmarkable AppleScript. to change tags to bookmark, keep out of main menu shuffle, and enable faster play. See discussion
Moriond on Applescript and
Moriond on mac in more detail
Quick Mac How-to
STEP-BY-STEP CONVERSION OF AUDIO CD to iPod/iTunes bookmarking file
A. Rip the audio CDs into iTunes into single AAC file for each CD.
A1. Options Settings:
Open iTunes, & Click on the top menu Edit > Preferences>


and click on Advanced Tab and then Importing Tab (More details here)
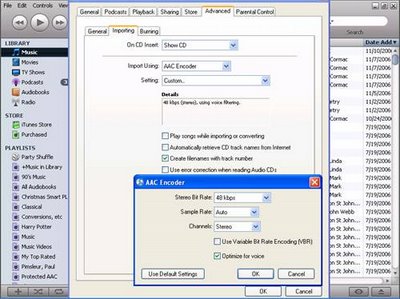
Set as follows
-On CD Insert to Show CD-Import Using to AAC Encoder
-check Create Filenames with track number
-uncheck Use error correction when reading Audio CDs.
-In "Settings" box, click on down arrow and choose "Custom" from dropdown
-In AAC Encoder Widow that opens:
a. select Stereo setting: 32 kbps for audible.com format 4 quality. Recommend 32/48kbps for audio books and 128kbps for music.
b. Set Channels to Stereo to avoid lock up bug.
c. Choose-Sample Rate: Auto (results in 22,020@32kbps)
d. check Optimize for voice
e. uncheck VBR
-Click OK
-Importing window now shows settings kbps and stereo, filter for voice.
Before importing music CDs, be sure to reset to 128 kbps.
A2. Open iTunes, & insert CD. CD will soon appear highlighted, in iTunes Source column If CD tracks do not appear, click on Audio CD in source column. If a window appears, or choose do nothing and click OK.
A3. Select all Tracks in order:Highlight all the tracks of the CD(Click on first track, then hold shift while clicking on the last track).
A4. Join Tracks Click on Advanced>Join Tracks. Results in single bracket around all the tracks & checked square to left of first track (See A6 screen shot). more details here

If Join Tracks is grayed out: Click on leftmost column heading and highlight all the tracks of the CD – all background, including leftmost untitled column, should be solid blue. For more, see this Apple link
A5. Enter Audio Book Information With all tracks still highlighted, Right click highlighted tracks,
 -Right Click>select Get Info. In resulting window validate or type in (navigation easiest with tab):
-Artist = Author Name
-Album Artist = Author Name
-Album = Book Name [IMPORTANT: Book Name should be IDENTICAL in album for each of the imported CDs so that they will all appear in same folder. Auto Fill will help after first CD. Eliminate any unique identification in the Album box. If you make a typo, R click that file>Get Info>Info tab, and re-key to force the file into the same Book Name folder.
-Genre = Conversion or an other genre which differentiates from audible.com genre of "Audiobook."
-Year= year
- Enter Disc Number and total discs. (key in X of Y; X = disc number and Y = Total discs. This is CRUCIAL to keep files uniquely identified.
-uncheck part of compilation to avoid iTunes placing in an iTunes\iTunes Music\Compilation\Bryson, Bill\A Short History of Everything, rather than an easier-to-find iTunes\iTunes Music\Bryson, Bill\A Short History of Everything.
Compilation can be undone later for one file or groups of files with get info>info, uncheck part of compilation.
A6. Convert to AAC
R Click on the highlighted tracks and choose convert selection to AAC (If only convert to mp3 is available, revist setting options above)–
 -If you have named each imported album identically as described in Step A4, iTunes will place an index to each file in the iTunes MUSIC Library for each CD. It may quell your panic to highlight the iTunes Library entries>R click>Show File> and see that each file is uniquely identified with its disc number X of Y. If not, sort Date Added column to identify where file falls in sequence.
Repeat steps A2-A6 for each CD of the audio book, making certain that Artist, Album, Book Name, & Genre inserted in step A4 are IDENTICAL for each of CDs and that each is uniquely identified by disc number
B. After all CDs are ripped & in Source/MUSIC Library as m4a files, rename the file extentions m4b, remove the song names that no longer have a file associated with it from iTunes, and add the renamed files to iTunes song list.
B1. With MUSIC Folder highlighted in Source Column, click on “Date Added? Column heading until the arrow points down; push the slider on the right side hard up to the top until all the new files appear at the top of the song list. Add column by right-clicking any column heading, then check “Date Added."
B2. Add sequence number to each file name to make its song name unique:
-For each file in turn R click>Get Info>Info tab
-Key in Disc number (or look at date/time added sequence to determine disc) as follows, from non-unique Book Name to:
Book Name 01_10A (1_9 is OK if less than 10 discs)
Book Name 02_10A
.
.
.
Book Name 10_10A (A=Abridged, UA=Unabridged)click here for screen adding unique sequence number
Optional: Merge AAC files to fewer files by using YAMB freeware to merge into files no greater than 5 hours listening length. Joins and renames m4b in one step. If you wish to take this route go to YAMB Tutorial now.
B3. Highlight and right click on any of the new files in iTunes Library Music Folder, sort it descending by Date Added Column, sliding the button on the right all the way up to see all the files.
-Select Show in Windows Foldder in the dropdown window. All of the imported (ripped) *.m4a files will appear in a window of the author\bookname folder, distinguished by a unique sequential number except for disc 1 with no number. This has changed. work in progress.B4. Highlight each of the files, clicking on “Rename this file? under “File and Folder Tasks? list on left.
Click here to see screen to rename to m4b.
IMAGE create new
-Change each file extension from *.m4a to *.m4b by deleting the “a? and keying “b’
If the m4a file extension does not show, click here to learn how to make it show-Click yes that wish to change.
-Repeat to rename all m4b
-Do not close this window, it is required for the next step
B5. Add Files to iTunes Library. There are several ways to do this, but I think this is simplest and most straightforward:
- Highlight all the files in the window (Control & Click simultaneously)
- Drag and drop all the files to the iTunes Audiobooks Folder in the Source Column of iTunes window.Screen shot
OR
-L click on one of the new file names. See this window (here SS74) which says “The Song “Book Name 1_5A? …original could not be found. Would you like to locate it? Click YES.
- In widow (click here) that opens with list of all the book files.
-Repeat for each file.
This will add each m4b file to the library
-iTunes will show an ! entry for the now-non-existent m4a files. Highlight all these files, R click and chose delete.
Alternate add to Library
If any files not show in Audiobooks, look here
All files successfully renamed *.m4b will now show in Audiobooks Folder of iTunes and iPod. Beginning with iTunes 7.0, they no longer appear in both Music and Audiobooks.
C. Place on iPod
Manual:
Search for file; Highlight files and Drag and Drop renamed and numbered files to iPod(FP46here)
Auto Synch:
Unchecking to prevent auto synch of all files(26here)
D. Optional: Create one + Smart Playlist(s) on iPod for ripped audio to make easy to find/manage. Smoothly proceed to next file, dropping off listened-to sections. (here FP20)Full AAC/m4b conversion is required to show in Audiobook menu and to play faster.If homemade mono files lock up your iPod, follow this link to Convert to Stereo Guide.Pre-4G iPods may lose bookmark in homemade files upon auto sync of iPod with iTunes.
Additonal Guides and Links related to Converting to Bookmarking iPod files:
CDs (This post without images)
MP3s
Cassettes
ANY SOUND Played on computer
MarkAble shareware CD/MP3 to iPod bookmark file
Audiobook FAQ with Screenshots
Burn CDs-AM&iTunes
My Book Recommends
posted by Robert at 7:48 AM
0 comments
![]()
